- Introduction
- Installation
- Setting up Beat Cube
- Info Page Editor
- Email Templates
- Uploading Beats
- Uploading Sound Kits
- Newsletter
- Manage Studio Bookings
- Marketing Tools
- Paying Your Affiliates
- Email Inbox
- Adding Plugins
- How to Add Language
- Production Catalog
- Studio Services
- Drafts
- Trash Bin
- Beat Cube Cloud
- Code Editor
- How To Update
- Troubleshooting Errors
Documentation

Latest Version 5.0.0


Introduction to Beat Cube
Thanks so much for your interest in Beat cube, let's do some introduction, so what is Beat Cube? Okay, Beat Cube is an automated beat selling software made for sound engineers who love to sell their beats and sound loops/kits to other sound engineers or artists.
Beat Cube makes your work easier for you by automating the entire transaction proccess while you focus on your beat creation projects.
It also comes with a fully packed website features that makes you run your online beat selling business with ease, with Beat Cube you don't need 3rd party apps or services like Google Analytics or an expensive newsletter service provider to keep track of your website/customers and sales, Beat Cube ships with everything a modern website needs in order to manage it's contents.
Why do you need Beat Cube as a beat seller/maker?
Beat Cube is the most cost effective way of running your beat selling bussiness, you don't need any monthly subscriptions of any kind apart from your web hosting and domain renewal cost that will come from your chosen hosting service provider.
The price for Beat Cube is a one time fee with no renewal cost except for custom themes that you may want, also the Beat Cube software updates are comletely free for a lifetime.
So with these you can now say good bye to the days you used to send beats to other engineers and artists by email!
The Beat Cube project also took more than a year to create and it involved the ideas of renown and experienced online beat sellers and sound engineers such as Ernest Oppong and DJ Rim Selekta of Rim Selekta Music amongst other sound engineers who also did thorough testing of the software after it was finished, so you are in good company when using Beat Cube :) and we will continue to improve upon the software with your ideas as time goes on!
Installation of Beat Cube
The installation of Beat Cube takes less than 2 minutes, the procedure is similar to installing most PHP applications, it comes with an installation wizard and you just fill in the fields and click install. Kindly follow the steps below.
The installation of Beat Cube takes less than 2 minutes, the procedure is similar to installing most PHP applications, it comes with an installation wizard and you just fill in the fields and click install. Kindly follow the steps below.
STEP2. Uploading Files: Download Beat Cube zip file from your account to your local hard drive after purchase and extract it using winrar or one of your favourite archiver software and upload the contents of the "app" folder using your FTP app or in the case of cPanel use the cPanel file manager to upload the contents, remember to put the contents of the "app" folder into a zip folder before you upload to your server using cPanel file manager after which you can now extract it.
STEP3. Extracting Files: Now that you have successfully uploaded the folder contents of the app in a zip format, you now need to extract it onto your server, after which you can now try to access the URL of the app directly in your browser, if you're using a sub domain then access it directly via the subdomain, eg. https://sub.domain.com and this should load the installer wizard immediately.
NOTE: There may be a popup telling you to mannually create cron job using a command, this happens when function "exec" is disabled on your server by your host due to security reasons, please make sure to copy down the command line and seek help from your host on how to execute it, cron must be set to run every 5 minutes or else Beat Cube will malfunction, if you do not see this popup, it means your host did not disable the funtion "exec" so Beat Cube can automatically create it's own cron jobs!
NOTE: There may be a popup telling you to mannually create cron job using a command, this happens when function "exec" is disabled on your server by your host due to security reasons, please make sure to copy down the command line and seek help from your host on how to execute it, cron must be set to run every 5 minutes or else Beat Cube will malfunction, if you do not see this popup, it means your host did not disable the funtion "exec" so Beat Cube can automatically create it's own cron jobs!
STEP1. Obtain Your Lifetime License Key: After your purchase of Beat Cube, you will need a product license key during the installation, do not worry, kindly contact us through our codester messaging system if you bought it on Codester or you can simply open a ticket on our website if you bought it directly from us, you will receive your key in less than 30 minutes as soon as we verify your payment.
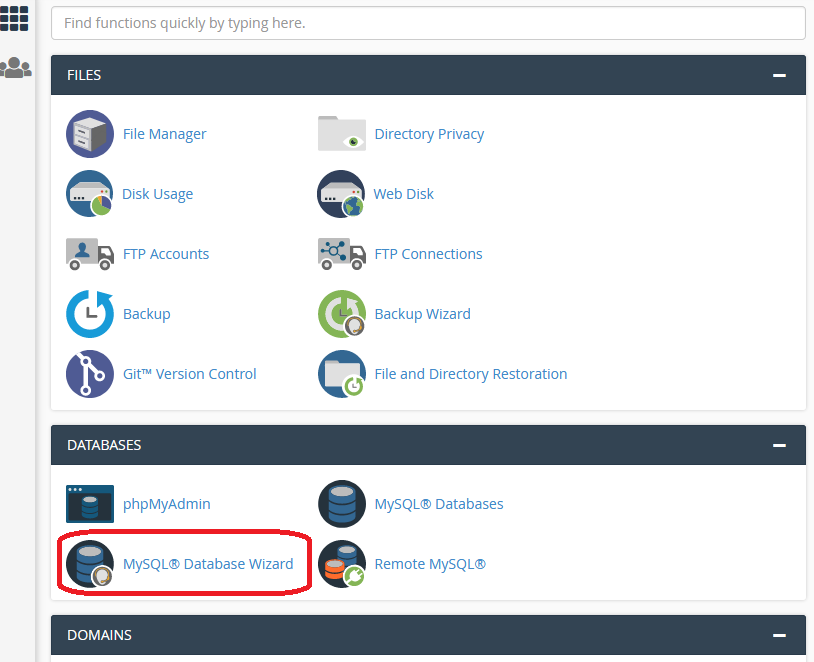
STEP4. Creating The Database: Now you need to fill in the fields required by the installer wizard, therefore you must create a new database if you already don't have one, if you're using cPanel, then use the MySQL Database Wizard and follow the steps to create your database.
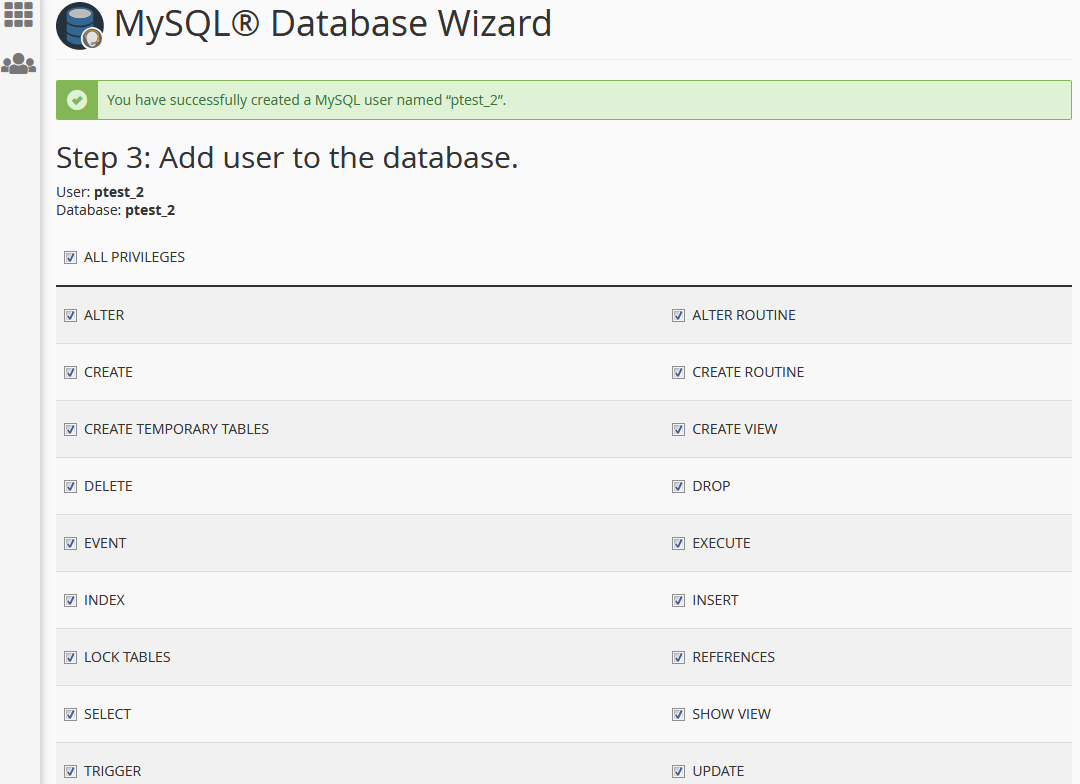
Remember to copy down the password you used in creating the database because we're going to need it for the installer wizard and also remember to allow all privilages as seen in the image below.
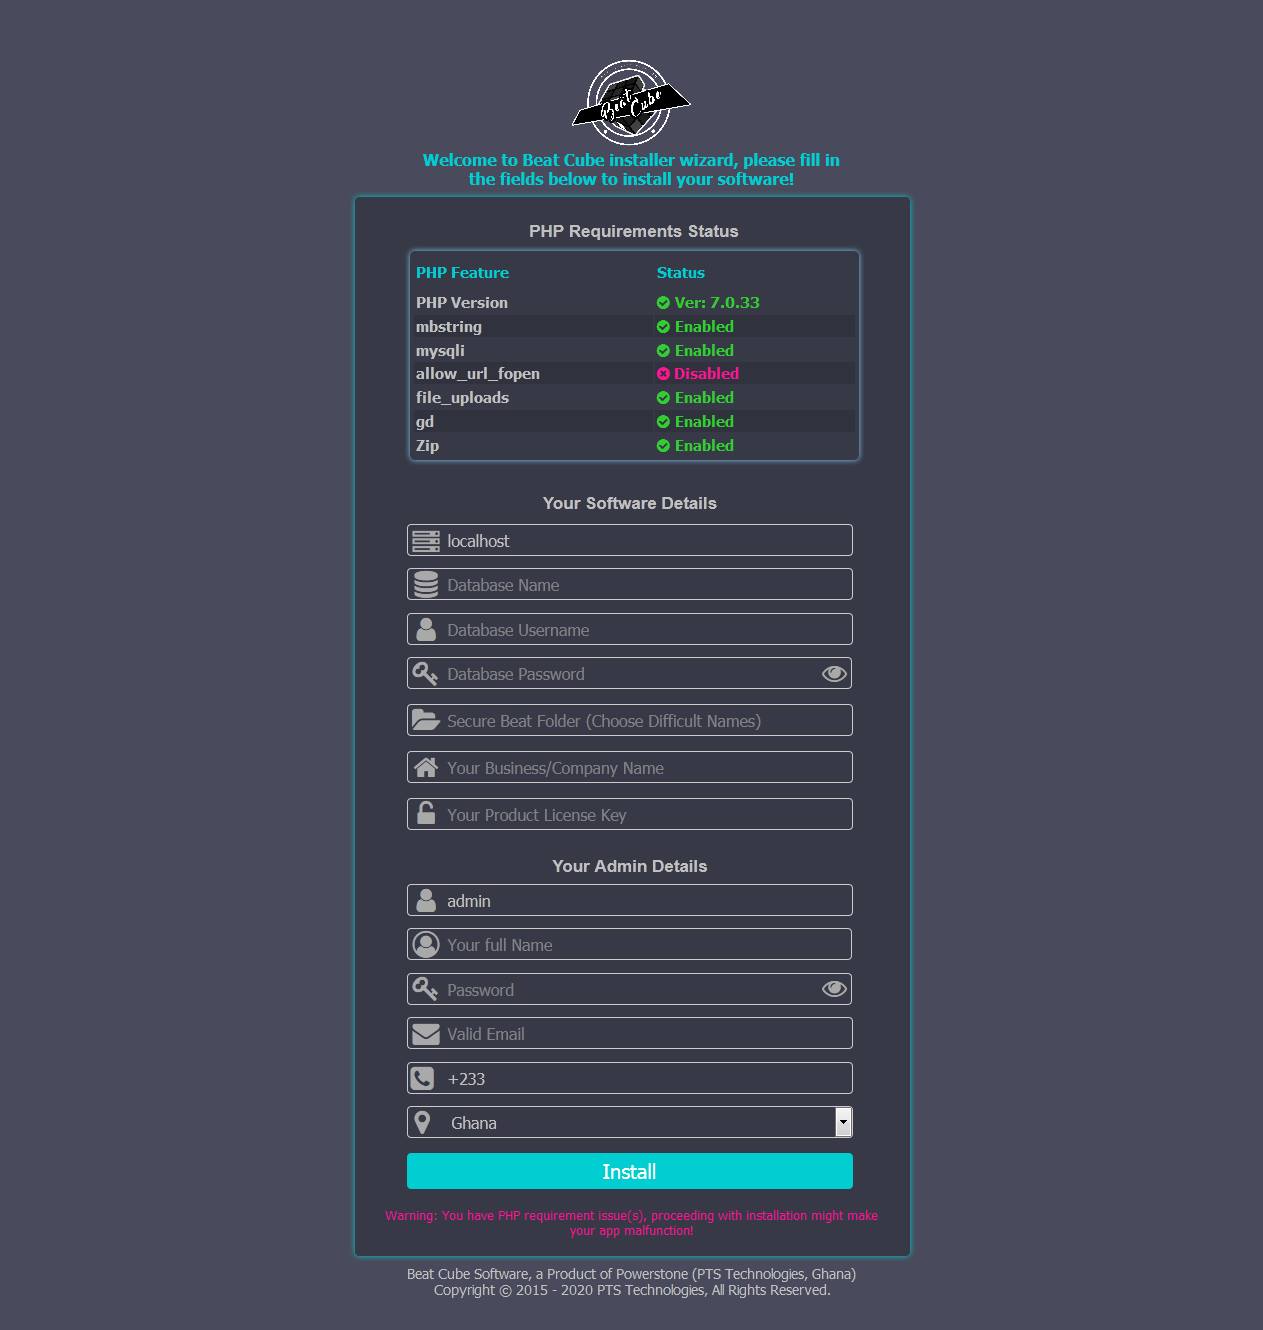
STEP5. Finalizing The Installation: Okay, now that you have created the database, fill in the fields of the wizard.
The "Secure Beat Folder" field might be a bit confusing, this is what you should fill in there; fill in alphanumeric characters, you don't need to memorize these characters as they are only requred by Beat Cube, Beat Cube will create a secure folder with this name and this is the folder in which all your beats and sound kits to be sold will be stored, so choose characters that connot easily be guessed,
Beat Cube secures all server folders by hiding them from the public but this will serve as another layer of security, now click "install" Note: confirm the DB host server name from your host, though it is usually localhost, with all credentials being correct, Beat Cube should now be fully ready for first use.
System Settings
Now that you have successfully installed Beat Cube, you must configure it to start working as you wish, so kindly login to the admin dashboard using the admin account credentials you provided during the installation proccess and click on the "System Settings" menu to go to the settings page.
Genral Site Settings: The general site settings of Beat Cube consists of 31 fields to configure
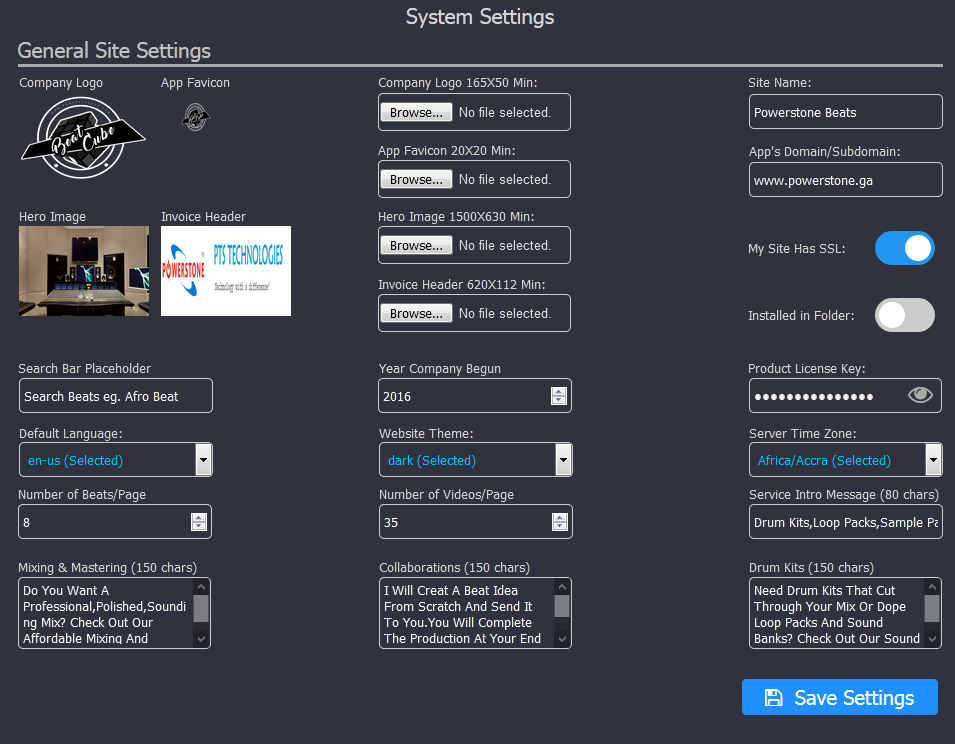
Company Logo: The company logo is the logo of your company which you would like to use to replace the default Beat Cube logo, this logo should measure 165X50 pixels minimum.
App Favicon: The App favicon is the favourites icon which you would like to use on your app, this usually is the same as the company logo but of a smaller size, minimum dimension should be 20X20 pixels.
Hero Image: The hero image is that big image/picture that visitors see first when they visit your website's home page, so choose a nice catchy picture for this and it's minimum dimension should be 1500X630 pixels.
Invoice Header: The invoice header is the picture or logo of your company that will be displayed on your customer's invoice after they make payment, it's minimum dimension should be 620X112 pixels.
Search Bar Placeholder: The search bar placeholder is the text that tells visitors/customers on your website about what to search for, example; "Search Beats eg. Afro Beat" and this will appear in your search bar on your homepage and beat store.
Note: Do not encourage visitors to search for terms including "type beats" example; "Rick Ross Type Beats", Beat Cube's internal search engine will bring up all results that include "Rick Ross" and also include "Type Beats", it's obvious all your beats will be tagged with "Type beat" after the artist's name so in this case you can see that Beat Cube will repeat all your beats after bringing the ones with the name "Rick Ross", this can make it difficult for the customer to find what they are looking for.
So what should you do? Just let visitors search for Type Beats using just the artist name, so you can write in the placeholder, something like; Search Type Beats eg. Rick Ross, and that will filter and bring up only the beats with the name "Rick Ross" in it, we'll improve the search engine with time but for now, just take note of that!
Default Language: Use this drop down to select your preferred default language, it will be applied throughout your entire website, Beat Cube comes with 3 different languages namely, English, French and Spanish but you can add your own language too, we have covered that also in the "How To Add Language" section of the documentation, remember visitors can choose their own language from the available languages when they visit your site as well.
Year Company Begun: This box should contain the very year you started your business, it will be used for the copyright notice on your page footers.
Number of Beats/Page: In this box you should enter the number of beats you want a visitor to load per each page in the beat store, you can leave it with the default value of 8 if you are unsure, but remember the lesser the number, the faster the beat store loads.
Number of Videos/Page: The number of videos you would like visitors to load per each page on your videos page, just like we did in number of beats per page, once again the default value is 35, you can enter your own but the lesser the value the faster the page!
Website Theme: The website theme dropdown lists the available themes on your system, Beat Cube comes with 2 themes, Dark and Light themes but you can also request for custom themes if you do not like any of the preinstalled themes, to install a new theme you must use the theme manager to upload the theme file (.bct) from your computer and let Beatcube install it for you and then you can choose that theme from here.
Site Name: This field should contain the name of your company/business or website, it will be used across the entire website including your outgoing emails.
App's Domain/Subdomain: This field should contain the URL on which Beat Cube is installed, by default Beat Cube will try to obtain this name during installation but can be wrong in cases where it is located in a folder on the server instead of a subdomain, hence it is your duty to make sure the domain value used here is valid else features like PayPal IPN and Bitcoin Notifications won't work!
My Site has SSL: Enable this option if Beat Cube is installed on an SSL domain, ie https://www.yourdomain.com, it is highly recommended to use SSL for Beat Cube else PayPal IPN won't work!
Auto Update: Enable this option if you want Beat Cube to automatically update itself without any human interference but we advice you do not enable this if you added some custom codes to the application or did any custom modifications as they will be overwritten!
Product License Key: This is your product license key which you used during the installation, you need it for free future software updates however in the case where you loose it, you can just contact us with your domain name and we shall recover it for you!
Server Time Zone: Choose your prefered time zone for your App, all continents are covered.
Mixing Service Info (New): This box contains brief introduction about your mixing services, maximum number of characters should be 150.
Booking Service Info (New): This box contains brief introduction about your studio booking services, maximum number of characters should be 150.
ID3 Tag Editing Info (New): This box contains brief introduction about your ID3 tag editing services, maximum number of characters should be 150.
Service Intro Message (New): This box contains brief introduction about the user's service history, maximum number of characters should be 150
Session Duration : Select the number of days you want PHP session to last, and note that cookies will also use this value.
Restrict Admins : Enable this option if you want admins to only be able to manage their own contents!
Use Default Colors : Enable this option if you want Beat Cube to use the default colors originally made for the login, signup, password recovery and 2 factor authentication pages!
Form Page Colors : Use the color picker to select the page background color for the login, signup, password recovery and 2 factor authentication pages, so they match your website perfectly.
Form Background Colors : Use the color picker to select the form background color for the login, signup, password recovery and 2 factor authentication pages, so they match your website perfectly.
Form Shaddow Colors : Use the color picker to select the form shaddow color for the login, signup, password recovery and 2 factor authentication pages, so they match your website perfectly.
Form Link Colors : Use the color picker to select the link color for the login, signup, password recovery and 2 factor authentication pages, so they match your website perfectly.
Form Button Colors : Use the color picker to select the form button color for the login, signup, password recovery and 2 factor authentication pages, so they match your website perfectly.
Form Text Colors : Use the color picker to select the text color for the login, signup, password recovery and 2 factor authentication pages, so they match your website perfectly.
Blog Article Categories : enter the various categories you wish to blog on (seperated by comma), you will be able to select them when writing your articles.
Intro: Write a brief intro for your website, this will appear above your search bar on the home page and will bear the H2 tag while your site name bears the H1 tag.
Payment Settings:This section has 11 fields to configure
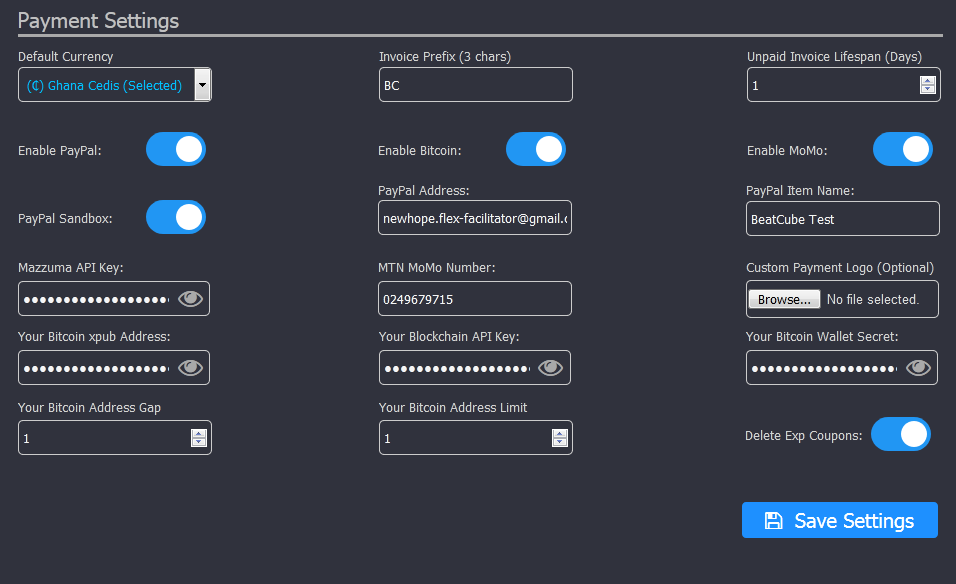
Default Currency: This field contains 14 currencies with 11 PayPal supported currencies, you can choose one of these as your default currency, remember the chosen currency symbol will be used throughout your website!
Note: The other 3 currencies not supported by PayPal are Ghana Cedis, Nigeria Nira and Vanuatu Vatu, therefore Beat Cube automatically converts the checkout amount to the US dollar equivalent if your customer chooses to pay with PayPal.
Invoice Prefix: This field should contain a maximum of 3 letters which you would like to appear befor the transaction Id's of orders.
Unpaid Invoice Lifespan: This field should contain the number of days you want an unpaid invoice to last on your system, the system will automatically delete the invoice and it's related orders when the period is due.
Enable Paypal: Enable this field if you wish to accept PayPal on your website and as soon as you click the flip switch, a popup will appear with the instructions you need to set up your PayPal IPN (instruction is only in English).
Enable Guest Checkout: Enable this field if you want your customers to be able to checkout without creating account, otherwise account creation is required to buy products.
Paypal Sandbox: Enable this field if you wish to test the app in a paypal sandbox environment, thereby not making any actual payment, turn it off to switch to production mode.
Paypal Address: This field should contain the PayPal address you wish to use in receiving payments, you must have already set up the IPN for this address.
PayPal Item Name: This field should contain the name you wish to diplay on the PayPal payment page as the item name.
Custom Payment Logo: Use this field to upload the logo of your manual custom payment service provider, example: western union etc and it will automatically appear on your website footer, you can simply change this logo by uploading a new one!
Delete Exp Coupons: Enable this option if you wish for Beat Cube to automatically delete promo coupons that have expired, you can also disable it if you wish to delete coupons manually.
Signup Bonus (New): Enter the amount that you wish to offer users as bonus, leave it at 0 if you do not want to offer sinup bonus.
Note: Beat Cube was using GeoPlugin API for it's realtime currency conversions, it was free, however somewhere in August 2025 they ended the free version, we shall work on the API so that you can use their premium version if you wish.
You can however use the Powerstone Geolocator which has the same function and was introduced by default in version 3.7.4
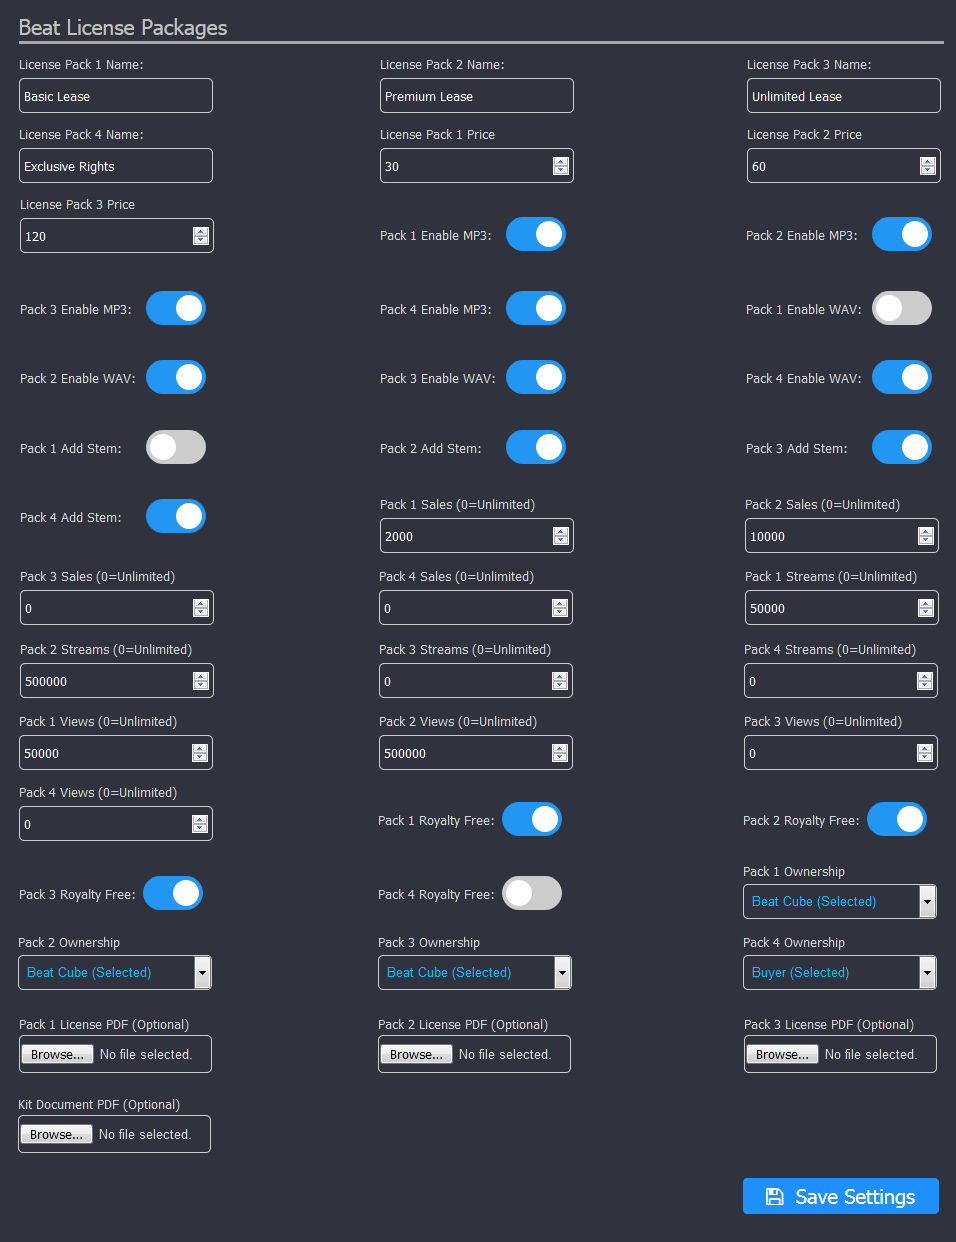
Beat License Packages:This section has 43 fields to configure
License Pack 1 Name: This field should contain the first/basic license package name eg. "Basic Lease".
License Pack 2 Name: This field should contain the second license package name eg. "Premium Lease".
License Pack 3 Name: This field should contain the third license package name eg. "Unlimited Lease".
License Pack 4 Name: This field should contain the fourth license package name which is the exclusive package eg. "Exclusive Rights" This package will be sold based on an agreement between you and the customer and it's sales will not be covered by Beat Cube data, the beats sold under this license are usually deleted by the admin after the sales.
License Pack 1 Price: This field should contain the price for the first license package, remember the default currency will be applied automatically on the website.
License Pack 2 Price: This field should contain the price for the second license package, remember the default currency will be applied automatically on the website.
License Pack 3 Price: This field should contain the price for the third license package, remember the default currency will be applied automatically on the website.
Note that the price for the 4th license package will be decided after you and your customer have come to an agreement and therefore will not be listed on the website.
Pack 1 Enable MP3: Enable this option to enable customers who purchase the license package 1 of your beats to download the MP3 version but remember this cannot be disabled as the MP3 version is the basic file version of your beat product!
Pack 2 Enable MP3: Enable this option to enable customers who purchase the license package 2 of your beats to download the MP3 version but remember this cannot be disabled as the MP3 version is the basic file version of your beat product!
Pack 3 Enable MP3: Enable this option to enable customers who purchase the license package 3 of your beats to download the MP3 version but remember this cannot be disabled as the MP3 version is the basic file version of your beat product!
Pack 4 Enable MP3: Enable this option to enable customers who would purchase the license package 4 of your beats to know that the MP3 version is also included, remember this cannot be disabled as the MP3 version is the basic file version of your beat product!
Pack 1 Enable WAV: Enable this option to enable customers who purchase the license package 1 of your beats to download the WAV version, remember you would still be required to upload the WAV file of the beat on the Beat Manager page even if you turn off this option, however customers cannot download the WAV if the option is turned off but the file will be available on your server, we shall improve upon it's flexibility in the future updates.
Pack 2 Enable WAV: Enable this option to enable customers who purchase the license package 2 of your beats to download the WAV version, remember you would still be required to upload the WAV file of the beat on the Beat Manager page even if you turn off this option, however customers cannot download the WAV if the option is turned off but the file will be available on your server, we shall improve upon it's flexibility in the future updates.
Pack 3 Enable WAV: Enable this option to enable customers who purchase the license package 3 of your beats to download the WAV version, remember you would still be required to upload the WAV file of the beat on the Beat Manager page even if you turn off this option, however customers cannot download the WAV if the option is turned off but the file will be available on your server, we shall improve upon it's flexibility in the future updates.
Pack 4 Enable WAV: Enable this option to let customers who would want to purchase the license package 4 of your beats to know that they will be able to also download the WAV version.
Pack 1 Add Stem: Enable this option to enable customers who purchase the license package 1 of your beats to download the stem files, but remember if you do not upload any stem files during the beat upload proccess, then enabling this option will be useless.
Pack 2 Add Stem: Enable this option to enable customers who purchase the license package 2 of your beats to download the stem files, but remember if you do not upload any stem files during the beat upload proccess, then enabling this option will be useless.
Pack 3 Add Stem: Enable this option to enable customers who purchase the license package 3 of your beats to download the stem files, but remember if you do not upload any stem files during the beat upload proccess, then enabling this option will be useless.
Pack 4 Add Stem: Enable this option to let customers who would purchase the license package 4 of your beats to know they will be able to download the stem files.
Pack 1 Sales: This field should contain the sales value for your license package 1, to give buyers unlimited value, just enter 0.
Pack 2 Sales: This field should contain the sales value for your license package 2, to give buyers unlimited value, just enter 0.
Pack 3 Sales: This field should contain the sales value for your license package 3, to give buyers unlimited value, just enter 0.
Pack 4 Sales: This field should contain the sales value for your license package 4, to give buyers unlimited value, just enter 0.
Pack 1 Streams: This field should contain the streams value for your license package 1, to give buyers unlimited value, just enter 0.
Pack 2 Streams: This field should contain the streams value for your license package 2, to give buyers unlimited value, just enter 0.
Pack 3 Streams: This field should contain the streams value for your license package 3, to give buyers unlimited value, just enter 0.
Pack 4 Streams: This field should contain the streams value for your license package 4, to give buyers unlimited value, just enter 0.
Pack 1 Views: This field should contain the views value for your license package 1, to give buyers unlimited value, just enter 0.
Pack 2 Views: This field should contain the views value for your license package 2, to give buyers unlimited value, just enter 0.
Pack 3 Views: This field should contain the views value for your license package 3, to give buyers unlimited value, just enter 0.
Pack 4 Views: This field should contain the views value for your license package 4, to give buyers unlimited value, just enter 0.
Pack 1 Royalty Free: Enable this option to give buyers of your license package 1 a 100% royalty free, disable it to display negotiable royalty in the license information!
Pack 2 Royalty Free: Enable this option to give buyers of your license package 2 a 100% royalty free, disable it to display negotiable royalty in the license information!
Pack 3 Royalty Free: Enable this option to give buyers of your license package 3 a 100% royalty free, disable it to display negotiable royalty in the license information!
Pack 4 Royalty Free: Enable this option to give buyers of your license package 4 a 100% royalty free, disable it to display negotiable royalty in the license information!
Pack 1 Ownership: Use this dropdown to choose who owns the beat purchased with your license package 1.
Pack 2 Ownership: Use this dropdown to choose who owns the beat purchased with your license package 2.
Pack 3 Ownership: Use this dropdown to choose who owns the beat purchased with your license package 3.
Pack 4 Ownership: Use this dropdown to choose who owns the beat purchased with your license package 4.
Pack 1 License PDF: Use this to upload a PDF copy of your license package 1 agreement onto your server and Beat Cube will automatically attach it to every beat purchased using this license package.
Pack 2 License PDF: Use this to upload a PDF copy of your license package 2 agreement onto your server and Beat Cube will automatically attach it to every beat purchased using this license package.
Pack 3 License PDF: Use this to upload a PDF copy of your license package 3 agreement onto your server and Beat Cube will automatically attach it to every beat purchased using this license package.
Kit Document PDF: Use this to upload a PDF copy of your sound kit package agreement onto your server and Beat Cube will automatically attach it to every sound kit purchased.
NOTE: It is mandatory to fill in all the packages with some information, even if you do not wish to issue more than one license package do not worry, you simply clean the price value of that package when uploading your beat using the beat manager, you can also adjust individual beat prices during upload!
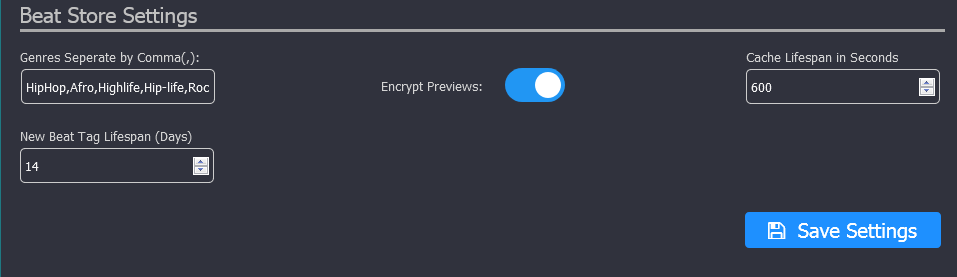
Genres Seperated by Comma(,): This box should contain all the genre of beats that you create and seperate them by comma(,), please DO NOT enter type beats here, it will confuse customers, remember not every artist likes type beats, some just want a beat belonging to a particular genre and when they click on the genre, the beat store should be able to filter that genre for them, you can provide type beats when uploading your beats, thanks.
Encrypt Previews: Enable this so that Beat Cube will change the file extension of your preview beats, this prevents visitors from downloading your previews for use without a license, howewer we advice that you still add audio tags to your previews as this method does not fully prevent vistitors from downloading your previews, also note that enabling this will prevent light weight browsers such as opera mini from being able to play beat previews.
Cache Lifespan in Seconds: This filed should contain the number of seconds you want Beat Cube to retain it's cache files before deleting them, remember this also include the download links used to download purchased beats from the server, in countries like Ghana where we have very bad internet services we suggest you give a much longer time to customers to be able to download their product files, we suggest you give a duration of at least 1 hour but depending on the product file sizes on your system you can increase it accordingly.
New Beat Tag Ligfespan: This filed should contain the number of days you wish to display the "New" tag on newly uploaded beats in your beat store, once the period is over, the tag will automatically disappear.
Popular Ribbon Package : Use this to choose which of your packages you want Beat Cube to apply the "Popular" ribbon on the home page!
Beat Store Settings:This section has 4 fields to configure
SEO Settings:This section has 13 fields to configure
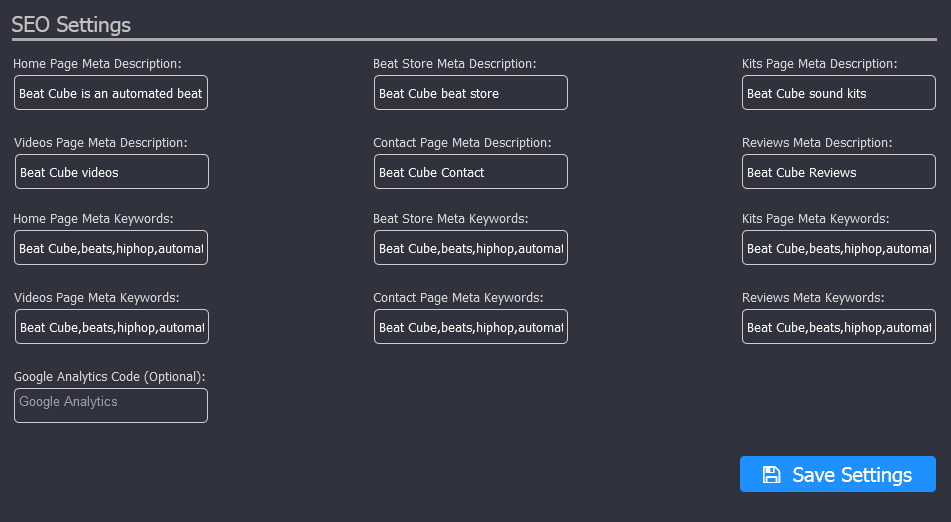
Home Page Meta Description: This box should contain the description for your home page, the description will be hidden in your meta tags which will be used by search engines to rank you.
Beat Store Meta Description: This box should contain the description for your beat store, the description will be hidden in your meta tags which will be used by search engines to rank you.
Kits Page Meta Description: This box should contain the description for your sound kits page, the description will be hidden in your meta tags which will be used by search engines to rank you.
Videos Page Meta Description: This box should contain the description for your video page, the description will be hidden in your meta tags which will be used by search engines to rank you.
Contact Page Meta Description: This box should contain the description for your contact page, the description will be hidden in your meta tags which will be used by search engines to rank you.
Reviews Meta Description: This box should contain the description for your reviews page, the description will be hidden in your meta tags which will be used by search engines to rank you.
Photos Meta Description : This box should contain the description for your photos page, the description will be hidden in your meta tags which will be used by search engines to rank you.
Home Page Meta Keywords: This box should contain the keywords for your home page, the description will be hidden in your meta tags which will be used by search engines to rank you.
Beat Store Meta Keywords: This box should contain the keywords for your beat store, the description will be hidden in your meta tags which will be used by search engines to rank you.
Kits Page Meta Keywords: This box should contain the keywords for your sound kits page, the description will be hidden in your meta tags which will be used by search engines to rank you.
Videos Page Meta Keywords: This box should contain the keywords for your videos page, the description will be hidden in your meta tags which will be used by search engines to rank you.
Contact Page Meta Keywords: This box should contain the keywords for your contact page, the description will be hidden in your meta tags which will be used by search engines to rank you.
Reviews Meta Keywords: This box should contain the keywords for your reviews page, the description will be hidden in your meta tags which will be used by search engines to rank you.
Photos Meta Keywords : This box should contain the keywords for your photos page, the description will be hidden in your meta tags which will be used by search engines to rank you.
Google Analytics Code: This box should contain your Google analytics, you really don't need this as Beat Cube already has it's own internal analytics but for those who still wish to use it can use it.
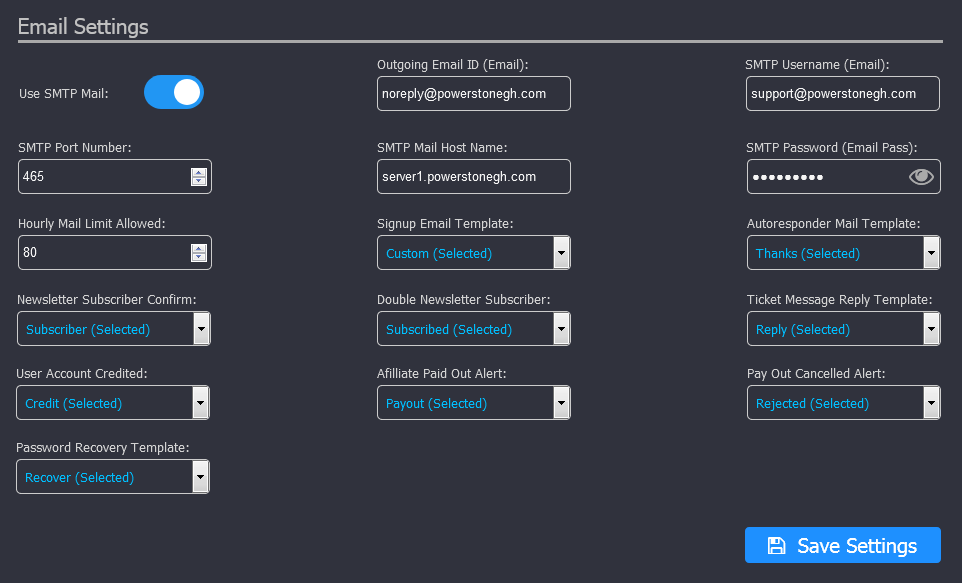
Email Settings:This section has 19 fields to configure
SMTP Email: By default Beat Cube is designed to send emails using PHP mail(), however this feature is disabled on some hosting servers for security reasons hence you're forced to use SMTP, to enable SMTP email you must provide the details of an existing email account of your choice on the server.
Outgoing Email ID: This is the email ID that will be used to send outgoing emails.
SMTP Username (Email): The SMTP username is usually an existing email account on your server, eg. email@yourdomain.com.
SMTP Port Number: This field should contain the SMTP port number to use!
SMTP Mail Host Name: This field should contain your SMTP host name, this is usually mail.yourdomain.com, however if you're not sure, kindly contact your host.
SMTP Password (Email Password): This field should contain the password of the email provided as the SMTP username!
Hourly mail limit Allowed: Beat Cube is designed with an inbuilt smart bulk mailing system, which helps you eliminate the use of third party software for newletter or bulk mailing purposes, to broadcast an email message to your customers and newsletter subscribers, just make sure you enter a value that does not exceed the number of emails allowed per hour by your host into this field and Beat Cube will use this figure to manage your sent emails, eg. Powerstone allows 100/hour on our server so you just enter a vlue like 99 if you're on our server.
Mail Interval : Enter the number of hours you want Beat Cube to wait before sending the next set of bulk emails, we advice you set 1 hour per the number of hourly mail allowed if your customers are less or equall to this number, so if the hourly mail is 100 and your customers are less than 100 then you can set the number to 1 but if your customers are 200 then you set the value to 2 hours but you can set it to a higher hour if that would be okay or if you experience a malfunction!
Signup Email Template: Use this dropdown to select the email template you want to use or send when new customers sign up on your system, you can create more templates using the "Email Templates" page.
Autoresponder Mail Template: Use this dropdown to select the email template you want to use or send when new customers contact you with the contact page, you can create more templates using the "Email Templates" page.
Newsletter Subscriber Confirm: Use this dropdown to select the email template you want to use or send when new customers sign up for your newsletter, you can create more templates using the "Email Templates" page.
Double Newsletter Subscriber: Use this dropdown to select the email template you want to use or send when already subscribed newsletter users atempt to sign up for your newsletter again, you can create more templates using the "Email Templates" page.
Ticket Message Reply Template: Use this dropdown to select the email template you want to use or send when you reply to customer ticket messages, you can create more templates using the "Email Templates" page.
User Account Credited: Use this dropdown to select the email template you want to use or send when you credit the account of a user on your system, you can create more templates using the "Email Templates" page.
Afilliate Pay Out Alert: Use this dropdown to select the email template you want to use or send when you pay out your affiliates, you can create more templates using the "Email Templates" page.
Payout Cancelled Alert: Use this dropdown to select the email template you want to use or send when you cancel the pay out request of an afilliate, you can create more templates using the "Email Templates" page.
Password Recovery Template: Use this dropdown to select the email template you want to use or send when customers want to reset their passwords on your system, you can create more templates using the "Email Templates" page.
2 Factor Auth Temp : Use this dropdown to select the email template you want to use or send when a customer enables double factor authentication, you can create more templates using the "Email Templates" page.
New Device Temp : Use this dropdown to select the email template you want to use or send when a new device logs into a customer's account, this email is automatically sent if the user hasn't enabled 2 factor Auth, you can create more templates using the "Email Templates" page.
Note: Beat Cube always checks new SMTP details before saving them and will alert you if there's an error so you don't dissapoint your customers on simple email services like password recovery!
Afilliate & Marketing Settings:This section has 10 fields to configure
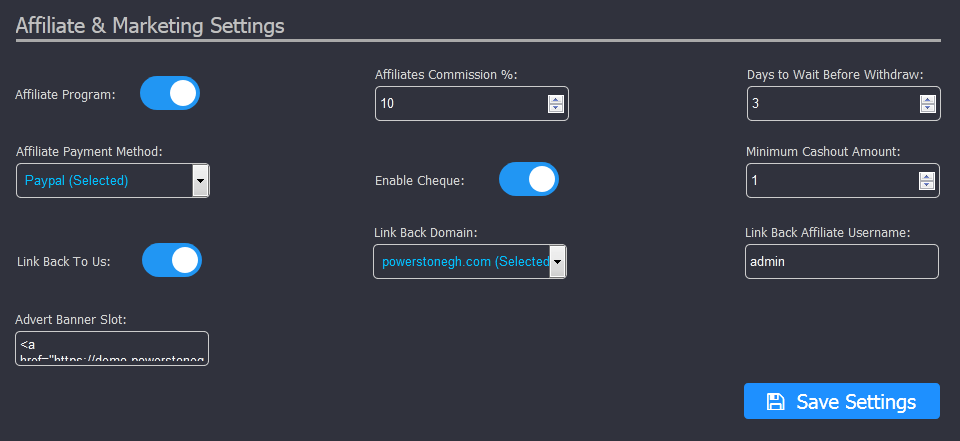
Another amazing feature about Beat Cube is that; it has it's own affiliate marketing system to help you promote your website 😊
Affiliate Program: Enable this option if you want to run affiliate program for your customers on your system, customers will earn a percentage of sales they refer by sharing your pages on blogs and social media.
Affiliate Commission %: This box should contain the percentage of commission you want your affiliates to earn when they refer customers to your website for a successful order!
Days to wait before withdrawing: This box should contain the number of days you want affiliates to wait before withdrawing their commission.
Affiliate Payment Method: Choose between mobile money and PayPal, how you want to payout your affiliates, we would recommend PayPal as it is international.
Enable Cheque: Enable this field if you wish to pay your affiliates through cheque.
Minimum Cashout Amount: This field should contain the minimum amount that an affiliate can withdraw, only numbers are accepted, no symbols should be entered.
Link Back to Us: Enable this option if you wish to link back to us for some commission on sales, remember you must have and account with Powerstone or codester to do this.
Link Back Domain: Choose the website you would like to link back to, powerstonegh.com or codester.com.
Link Back Affiliate Username: This box should contain the your username on the link back website in order to earn.
Advert Banner Slot: This box should contain the html code of an advert you might want to run on your website.
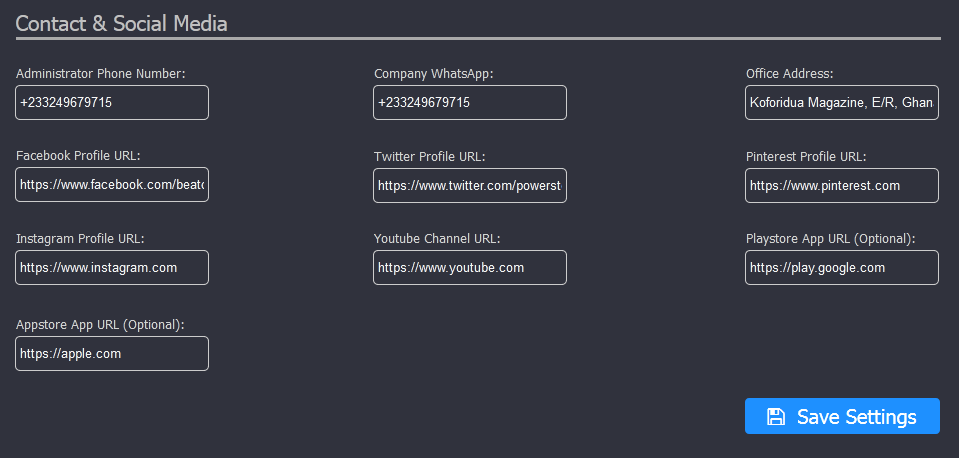
Contact & Social media Settings:This section has 10 fields to configure
Administrator Phone Number: This box should contain the system administrator's phone number or company's phone number which will be used on the contact page.
Company WhatsApp: This box should contain the WhatsApp number of your company or business!
Office Address: This box should contain the address location on your business or office, remember to provide an address that Google can easily map in case you wish to use Google maps.
Facebook Profile URL: This box should contain the full URL to your Facebook business profile, you can leave it as it is if you do not have or wish to add Facebook business profile.
Twitter Profile URL: This box should contain the full URL to your Twitter business profile, you can leave it as it is if you do not have or wish to add Twitter business profile.
Pinterest Profile URL: This box should contain the full URL to your Pinterest business profile, you can leave it as it is if you do not have or wish to add Pinterest business profile.
Instagram Profile URL: This box should contain the full URL to your Instagram business profile, you can leave it as it is if you do not have or wish to add Instagram business profile.
Youtube Channel URL: This box should contain the full URL to your Youtube Channel, you can leave it as it is if you do not have or wish to add your Youtube profile.
Reddit Profile URL (New): This box should contain the full URL to your Reddit account.
Snapchat Profile URL (New): This box should contain the full URL to your Snapchat account.
Spotify Profile URL (New): This box should contain the full URL to your Spotify account.
SoundCloud Profile URL (New): This box should contain the full URL to your SoundCloud account.
Amazon Profile URL (New): This box should contain the full URL to your Amazon account.
WhatsApp Channel URL (New): This box should contain the full URL to your WhatsaApp channel.
TikTokProfile URL (New): This box should contain the full URL to your TikTok account.
Playstore App URL: This box should contain the full URL to your Beat Cube app in Playstore if you have one, this will enable App enthusiasts to get your App easily. You can leave it epty or as it is if you do not have an app yet.
Appstore App URL: This box should contain the full URL to your Beat Cube app in Appstore if you have one, this will enable App enthusiasts to get your App easily. You can leave it epty or as it is if you do not have an app yet.
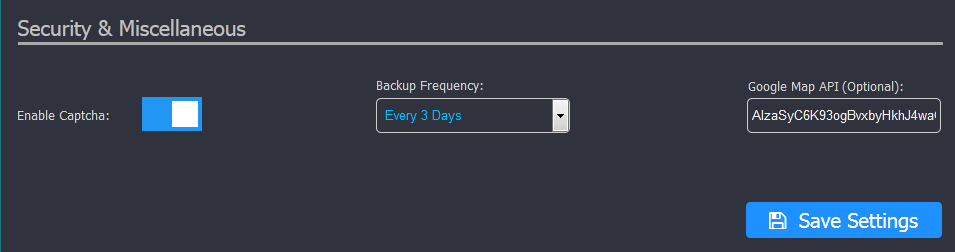
Security & Miscellaneous Settings:This section has 3 fields to configure
Enable Captcha: Enable this option to add a layer of security to your signup and contact forms to prevent bots.
Enable Firewall (New): Enable this option to enable your HeatFence firewall.
ID3 Tag Download Info (New): Type in what you want to be added to the mp3 file names that will be edited on your system using the ID3 tag editor (eg. Tags edited from Beat Cube).
ID3 Tag Hourly Limit (New): Enter the number of files that can be edited in your ID3 tag editor in an hour, users will have to wait for an hour to continue editing after they reach that number.
Service Validity Days (New): Enter the number of days that you want to keep customer's files on the server for them on their "services" page, the files are deleted after this period but the data is kept with the status "Expired", set this number to "0" if you never want the files to be deleted (This does not affect ID3 Tag Services!).
Backup Frequency: Choose how often you would like Beat Cube to remind you to backup your system's database.
Geolocation Server: Use this to select the server that Beat Cube will use to convert currency in real-time and also tack visitor locations, it is set to Powerstone by default, note Geoplugin is not free!
Info Page Editor
Now that you have finished configuring your site settings, it's time to also add some information about your business, edit and add contents to your "About us", "ToS", "Affiliate program", "Services rendered", "How to manually top up your account, eg: western union tranfer instructions" and your "error 404" pages using a rich text editor!
Now that you have finished configuring your site settings, it's time to also add some information about your business, edit and add contents to your "About us", "ToS", "Affiliate program", "Services rendered", "How to manually top up your account, eg: western union tranfer instructions" and your "error 404" pages using a rich text editor!
Email Templates
Now set up your system email templates for the various services using a rich text editor, remember to add the appropriate variables when creating new templates by choosing the email type, Beat Cube already has one template each for every email type but you must edit them for your system by clicking the dit button!
Now set up your system email templates for the various services using a rich text editor, remember to add the appropriate variables when creating new templates by choosing the email type, Beat Cube already has one template each for every email type but you must edit them for your system by clicking the dit button!
Uploading Beats
Now you can click on the "Beat Manager" to start uploading beats, provide all the various information on the upload form and Beat Cube will automatically determine bitrate, file size and duration of the WAV file of your beat and remember to provide only alphanumeric characters as beat title, do not use any other special characters as Beat Cube will generate your beat URI using the title, and also make sure to not provide duplicated titles (no two beats or sound kit and a beat should bear the same title).
Finally in version 4.5.9 you can now do bulk upload, just add all the files from the upload page and wait for it to finish the upload process and take you to the files tab where you will select the files you previously uploaded and proceed to provide the need information for your product
Beat Cube as at version 2.1.7 supports scheduling of beat releases, click within the schedule date field on the info tab to select a date from calendar and click the schedule time field to choose the time within that day that your beat should go live, remember the times and dates are based on your server's default time zone, you can change this from system settings, leave this field blank if you do not wish to schedule the beat.
Uploading Sound Kits
Follows the same proceduce as uploading your beats, just click on the "Sound Kit Manager" to begin.
Follows the same proceduce as uploading your beats, just click on the "Sound Kit Manager" to begin.
Newsletter
This page contains the form that you can use to write email message and send to your customers, remember that the newsletter uses an intelligent robot that helps send out your emails so that you don't bypass the mail limit from your host.
Also remember to use the variables provided on the page to send interactive emails to users, example this variable {{ fullname }} will write my name in the email as "Newhope Bedzra" if I signed up for your newsletter and you sent me a newletter with that variable in it.
Manage Studio Bookings
This page contains the list of all studio bookings, you can postpone or start a session for any booking from this page, if a customer brings their studio card; you should first log into your admin account before scanning the QR code on the studio card, that way you can easily manage the customer's session by starting the session or postponning it.
Remember if you postpone a session then you will have to manually decide on a new date and/or time with your customer and this time when you start a postponed session it will end it almost immediately because the session time had already past.
You can start a session about 10 minutes before it is due and Beat Cube will automatically end the session after the number of hours paid for is due, customers will receive an email automatically telling them that their sessions are due and they can now leave their feedbacks on your feedback page or Google profile.
Remember each midnight Beat Cube will automatically send you a list of all studio bookings for that day and their respective hours if there is any, you will also receive an email alert for every booking made on your website, the timeslot for bookings not paid for will be available for others to book.
The calandar view can help you get a better overview of how the days ahead may look like, so you may plan adequately.
Lastly remember to add holidays and your resting days properly in the right format into the "Holidays" field of your site settings and not forgeting your opening and closing hours for each day of the week as this will affect how customers book your studio.
Marketing Tools
This page will be going away in the next version, now Beat Cube supports embedded audio player which already has the affiliate or marketing featured embedded in it!
This page will be going away in the next version, now Beat Cube supports embedded audio player which already has the affiliate or marketing featured embedded in it!
Paying Your Affiliates
Click on the "Payout Request" Button to pay your affiliates and when paying an affiliate you must make sure to click the "Return to Merchant" button after payment on PayPal in order for Beat Cube to be able to update the transaction record of that order, that is if the affiliate chooses PayPal for withdrawal. For the other payment methods, just make sure you have actually sent payment to affiliate before clicking on the confirm payment button.
Click on the "Payout Request" Button to pay your affiliates and when paying an affiliate you must make sure to click the "Return to Merchant" button after payment on PayPal in order for Beat Cube to be able to update the transaction record of that order, that is if the affiliate chooses PayPal for withdrawal. For the other payment methods, just make sure you have actually sent payment to affiliate before clicking on the confirm payment button.
Email Inbox
We managed to provide you with an interface to read incoming emails, Beat Cube will be able to synchronize with your inbox once you use SMTP mail service, so Beat Cube basically uses your SMTP credentials to synchronize with your business email so that you can read your emails.
However, note that this is not a replacement for your mail client, you will still need webmail to reply your contacts or even download attachments, this interface is experimental and cannot decode all mime types or reply to mails, so you may still need a mail client for full functionality, this feature is only to help you know you have received an unread message which you can quicky read without having to login to your mail client unless it is necessary!
How to Add Language
Adding a new language is easy but a bit technical, however anybody with good computer knowledge can do it, we have made it very simple, all the words and terms used in Beat Cube are translated.
In order to add your language, you will have to translate all 745 lines of code that translate each word, Beat Cube already has 3 languages, namely English, French and Spanish.
To add yours, you will have to create a dublicate of any of the language files found in the "locale" folder in your Beat Cube directory and take note of the following, this is how you name your language file; the first two or three letters of your language, bring a dash (-) without space and then your country code, remember the extension of your language file must be .php.
example of language files can be seen in the "locale" folder, US English file is en-us.php, so en: stands for the language English, US for the country code and then the .php is the file extension.
So let's imagine I want to create my mother language, the local language I speak is Ewe from Ghana, so I will create and name the Ewe language file as "ewe-gh.php" and once you do this, Beat Cube will see it automatically when you visit the home page, and users can now select this language when they come to your website and you can also choose it as your default language in system settings.
Also when you open any of the language files in the locale folder, the translation starts with $lang["home"] = "Meaning of home in this language"; so you can simply change the meanings but do not touch or edit this; $lang["home"] for this serves as your language index of the defined language variable, changing it will mess up your website when that language is chosen.
So imagine I want to translate "home" in my Ghanaian language (Ewe), I'll do this; $lang["home"] = "Afeme"; because Afeme in Ewe means home, that should be easy to do right? 😊
How to Update Beat Cube to Latest Version
Updating Beat Cube is very simple, with your product license key, you just click on "Auto update from server" and it will be done in a few minutes however if you do not wish to use this method just download the latest version from your account and upload the app contents onto your server, after which you can just extract it and overwrite the old files, then log into your admin account and it will automatically update it's database.
Updating Beat Cube is very simple, with your product license key, you just click on "Auto update from server" and it will be done in a few minutes however if you do not wish to use this method just download the latest version from your account and upload the app contents onto your server, after which you can just extract it and overwrite the old files, then log into your admin account and it will automatically update it's database.
Troubleshooting Errors
At this moment Beat Cube only has 1 error code but could be as a result of so many reasons and the known reasons are listed below.
When you try to upload a beat or a sound kit and Beat Cube tells you Oops Upload failed, Error Code: PBC001, what does that mean?
When this error pops up, thses are the things you can try to do to resolve the error;
1. Either your upload_max_filesize or post_max_filesize value is lower than the file you are uploding. To solve this, check from Beat Cube's health center, you can see the upload_max_filesize value there, if the value is big, then you can check your web hosting control panel for the post_max_filesize value too, if either or both values are below that of your file size then you need to increase it from your control panel or php.ini file, you can ask your host about how to do that.
2. File upload must have been disabled on the server, confirm from health center if it is true then enable it from your web hosting control panel or the php.ini file.
3. It could be your network, slower network speeds can interrupt the upload process, so check to make sure you have a very good internet speed when uploading.
4. It could also be your server; if all the above possibilities areruled out, then it's likely your server wants to play some mind games with you, contact your host to explain the situation and they might help, if not, find another host!
When you try to upload a beat or a sound kit and Beat Cube tells you Oops Upload failed, Error Code: PBC002, what does that mean?
It simply means you have to contact us, something is wrong with the script, usually a bug, so just reach out to us and we'll fix it, thanks.
Customer side; now Beat Cube loads using ajax, if a customer complains about not being able to add beats to cart just simply ask them to refresh their page and that should work, the reason is because the session token has expired, increrase your session duration in PHP both on your server and the application to solve this in case your clients face it.
After updating your script from version 1.0.0 your customers would realize their avatars no longer appear, they should simply re upload a new avatar, the avatar URL was changed to make room for the social login plugins!
At this moment Beat Cube only has 1 error code but could be as a result of so many reasons and the known reasons are listed below.
When you try to upload a beat or a sound kit and Beat Cube tells you Oops Upload failed, Error Code: PBC001, what does that mean?
When this error pops up, thses are the things you can try to do to resolve the error;
1. Either your upload_max_filesize or post_max_filesize value is lower than the file you are uploding. To solve this, check from Beat Cube's health center, you can see the upload_max_filesize value there, if the value is big, then you can check your web hosting control panel for the post_max_filesize value too, if either or both values are below that of your file size then you need to increase it from your control panel or php.ini file, you can ask your host about how to do that.
2. File upload must have been disabled on the server, confirm from health center if it is true then enable it from your web hosting control panel or the php.ini file.
3. It could be your network, slower network speeds can interrupt the upload process, so check to make sure you have a very good internet speed when uploading.
4. It could also be your server; if all the above possibilities are
When you try to upload a beat or a sound kit and Beat Cube tells you Oops Upload failed, Error Code: PBC002, what does that mean?
It simply means you have to contact us, something is wrong with the script, usually a bug, so just reach out to us and we'll fix it, thanks.
Customer side; now Beat Cube loads using ajax, if a customer complains about not being able to add beats to cart just simply ask them to refresh their page and that should work, the reason is because the session token has expired, increrase your session duration in PHP both on your server and the application to solve this in case your clients face it.
After updating your script from version 1.0.0 your customers would realize their avatars no longer appear, they should simply re upload a new avatar, the avatar URL was changed to make room for the social login plugins!
All of us here at PTS Technologies want to say a very big thank you once again for buying our product, we promise to help and support you always. We also have a free 30GB storage web hosting server space for you for 1 year and after that you only pay $1.5/month for it, it's optional and if you are interested then contact us now, thanks.
If you face any challenges or need some advice on how to use Beat Cube, feel free to contact us on Codester, or our website or even send us a WhatsApp message on +233249679715, do not also forget to give us 5 stars if you bought it from Codester, thanks and stay safe. (Newhope)
If you face any challenges or need some advice on how to use Beat Cube, feel free to contact us on Codester, or our website or even send us a WhatsApp message on +233249679715, do not also forget to give us 5 stars if you bought it from Codester, thanks and stay safe. (Newhope)
Plugins
As of version 2.1.7 Beat Cube supports plugins to help expand the features to make room for extra features, beat cube version 2.1.7 comes with 3 free plugins;
social login plugin, Paystack payment plugin and Mazzuma payment plugin, all plugins come with links to their various parent websites for their API keys and other credentials
The mazzuma API requires a little tweak with regards to page colors, the various color codes to use depending on the theme chosen are below!
Dafault Light Theme:
Form Backround: #ffffff Button Text:#ffffff Form Shaddow: #d3d3d3 Button Background: #00ced1
Dafault Dark Theme:
Form Backround: #3c3c3c Button Text:#3c3c3c Form Shaddow: #d3d3d3 Button Background: #00ced1
However you can play around the colors for your own choice and also depending on your theme color if it is a custom theme we would give you the color codes!
Booking Settings:This section has 21 fields to configure
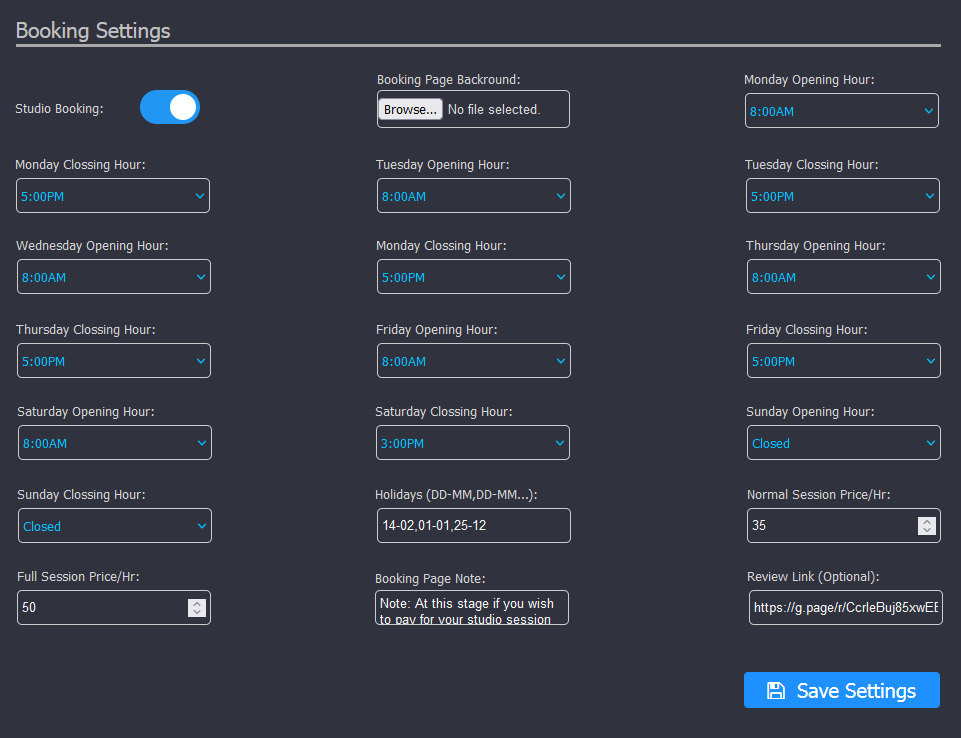
Studio Booking: Toggle this to enable/disable the automated online studio session booking system.
Booking Page Backround: You can use this to upload the best shot from your recording studio, this photo will be used as the background for the booking page only, highresolution photos work best and try to keep the format in jpg to ake it light and fast to load!
Monday Opening Hour: Choose from this dropdown the time your recording studio opens on Mondays!
Monday Closing Hour: Choose from this dropdown the time your recording studio closes on Mondays!
Tuesday Opening Hour: Choose from this dropdown the time your recording studio opens on Tuesdays!
Tuesday Closing Hour: Choose from this dropdown the time your recording studio closes on Tuesdays!
Wednesday Opening Hour: Choose from this dropdown the time your recording studio opens on Wednesdays!
Wednesday Closing Hour: Choose from this dropdown the time your recording studio closes on Wednesdays!
Thursday Opening Hour: Choose from this dropdown the time your recording studio opens on Thursdays!
Thursday Closing Hour: Choose from this dropdown the time your recording studio closes on Thursdays!
Friday Opening Hour: Choose from this dropdown the time your recording studio opens on Fridays!
Friday Closing Hour: Choose from this dropdown the time your recording studio closes on Fridays!
Saturday Opening Hour: Choose from this dropdown the time your recording studio opens on Saturdays!
Saturday Closing Hour: Choose from this dropdown the time your recording studio closes on Saturdays!
Sunday Opening Hour: Choose from this dropdown the time your recording studio opens on Sundays!
Sunday Closing Hour: Choose from this dropdown the time your recording studio closes on Sundays!
Holidays (DD-MM,DD-MM...): Use this field to enter holidays or the week days that you do not work or open your studio to the public and it will be disabled on the calendar if a user tries to book your studio on these days.
Normal Session Price/Hr: Enter the mount to be charged in your set currency if someone want's to book your studio without you or your engineer for 1 hour.
Full Session Price/Hr: Enter the mount to be charged in your set currency if someone want's to book your studio with your engineering services for 1 hour.
Booking Page Note: Enter a messge to be shown to users after they have queried your available time slots.
Review Link (Optional): Enter a Google or any review link or url that will be sent to customers to follow and write their reviews about your studio, leaving it blank means Beat Cuse will use the site's own review page which is only accessible to logged in users!
Production Catalog (NEW)
As of version 4.5.9 Beat Cube introduces production catalog for producers to showcase tracks that they've worked on for artists, you can slect the role that you played in the production of the track, such as "Mixed & mastered, recorded & mixed" etc.
Uploading a track: You can do this by clicking on the "Production Catalog" menu to visit the page and then click on "Upload Track" to begin.
Remember to add ID3 tags to the track you wish to upload on this page because Beat Cube will read this and use the cover art from the mp3 file itself!
We advice you only upload up to 1 minute duration and you can add the streaming platform links of each track and save them.
Studio Services (NEW)
As of version 4.5.9 Beat Cube also introduces studio services, which is shown to the customer as "Virtual Studio", this is a medium through which customers can upload their project for you to work on at a cost, services such as mixing and mastering are now easier to deliver through your own website securely without any 3rd parties involved.
Placing the order: The customer chooses between 3 services "Mixing or Mastering or Mixing & Mastering" and then uploads their stem files (in a zipped folder), they can also choose a beat from your beat store in which case they must have already paid for the beat and choose their reference track link which could be from your own production or someone else's, then they now choose their prefered payment option and submit the order to you.
Processing the order: After the customer has sent their order, you will see it as "pending" and now have the opportunity to download the zip folder and check to be sure that all necessary files for the service being ordered are intact, if not then you use the "Declare Error" button to inform the customer of what is missing and ask them to reupload it and submit to you for checking again, when everything is now correct, you use the "send quote" button and enter the amount for the service charge, the customer is then sent an email alert to make payment using their chosen payment gateway, after the payment is sent, the order status now changes to "Undelivered".
Delivering the order: After the payment is completed you now have to deliver the order to the customer.
You now place all files into a zip folder and upload, the customer will then be sent an email alert to download and check their orders.
Note that for any service involving Mastering you will have to upload an mp3 file in addition to the zip file or an mp3 file only, depending on your policies, but no matter what the moment the service involves Mastering then upload an mp3 file, this is how the mp3 file should be added, you wish to deliver other stem files then zip the stem files together as one file and then select the mp3 file together with the zip folder and upload on the delivery form.
Services that must be delivered with a separate mp3 file are:
(1) Mastering service
(2) Mixing & Mastering service
Make sure this mp3 file has a bitrate of at least 320kps otherwise Beat Cube will reject the delivery.
Your customers can add their own ID3 tags to the mp3 file from the service page by clicking on the options menu and selecting "Edit ID3 Tag" after you deliver.
In case a customer calls for the review of his/her oder and you will have to deliver it again, then use the Beat Cube cloud to securely share the file with the customer.
Note that the "Service validity days" in system settings affects your delivery too, so when configuring your Beat Cube, consider this
Drafts (NEW)
As of version 4.5.9 Beat Cube supports bulk upload of various files unto your server at once and until these files are used for the purpose for which they were uploaded they will remain on the drafts page, you can delete them from there if you no longer need them, files deleted here are not sent to trash bin!
As of version 4.5.9 Beat Cube supports bulk upload of various files unto your server at once and until these files are used for the purpose for which they were uploaded they will remain on the drafts page, you can delete them from there if you no longer need them, files deleted here are not sent to trash bin!
Trash Bin (NEW)
As of version 4.5.9 Beat Cube supports trash bin for contents deleted from the beat manager, kit manager, catalog manager and Beat Cube cloud, the algorithm is yet to extend through the entire Beat Cube Software, the contents sent here are deleted after 30 days automatically by the garbage collector.
As of version 4.5.9 Beat Cube supports trash bin for contents deleted from the beat manager, kit manager, catalog manager and Beat Cube cloud, the algorithm is yet to extend through the entire Beat Cube Software, the contents sent here are deleted after 30 days automatically by the garbage collector.
Beat Cube Cloud (NEW)
Welcome to my most favourite feature in Beat Cube version 4.5.9, the Beat Cube cloud.
This is a personal cloud server for you to save backups securely for yourself or use to share files with customers or users, on the user side this feature is known as "Freebie Cloud"
File & Folder Permissions;
Inherit: it means it will use the same permission as it's parent folder.
Public: this means that the file or folder is visible from the Freebie cloud regardless of the permission of it's parent folder.
Hidden: this means the file is only visible to administrators but not available on the Freebie cloud (The root folder is set to this permission by default, so take note)
Private: This folder is only visible to you the administrator who created it, no other user or admin can see it, however, note that you can create a public folder or file with public permission in this folder and share with users or even make it visible on the Freebie cloud.
You can share a file with someone directly by entering their email after clicking the share option and the person will receive a secure link to download the file directly, this can be useful for delivering services that have been reviewed, but remember to set the permission of the file to "Hidden" in the case where you only wish to share the file with some selected people.
Naming of files/folders; if you duplicate the name of an item on the Beat Cube cloud it will only save the new item with the date and time in brackets such as Test Folder (2025-09-30, 2:13pm), but you can rename this afterwards.
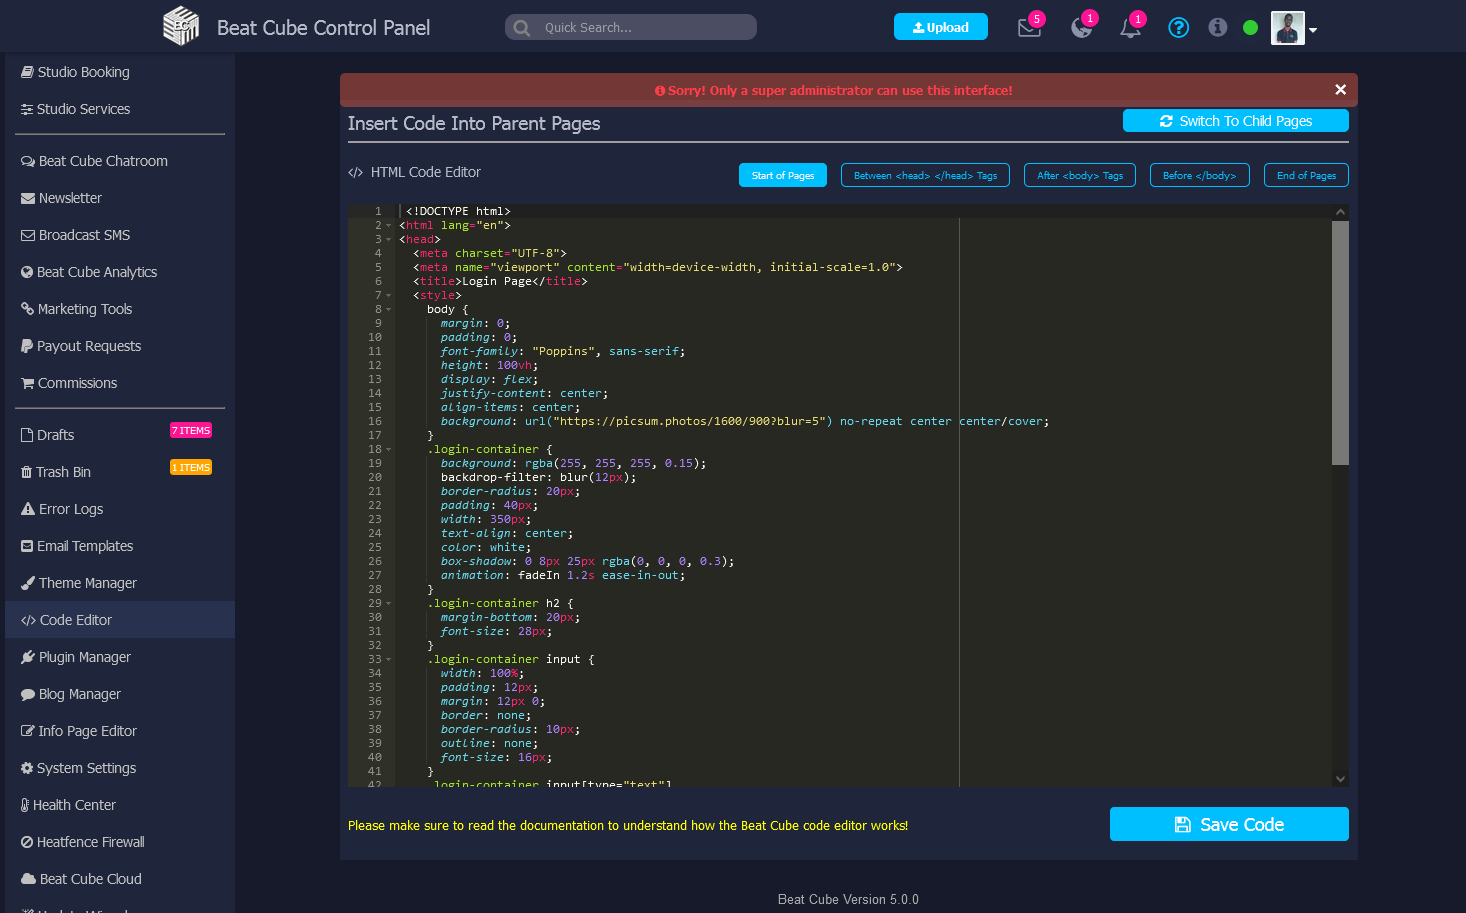
Beat Code Editor (NEW)
Finally in version 5.0.0 we've introduced a code editor, now you can customize colors and add your own widgets or plugins.
Supported code types you can add to your website using the code editor include JavaScript, CSS and HTML, the code editor supports features such as syntax highlighting, auto-completing and debugging, a full IDE unlocking your potentials if you know a bit about coding and once the code is saved no new version update will affect it, it's saved in your database until you edit it yourself.
Where to insert codes:
Start of pages: This part is the very beginning of your pages (We do not advice you insert any code here unless you were told).
Between <head></head> Tags: this part is suitable for your custom CSS codes and some JavaScript codes.
After <body> Tags: This is the very beginning of the <body> tag of your pages (Only insert a code here when asked to do so)
Before </body>: This is the very end of the <body> tag of your pages (Only insert a code here when asked to do so)
End of Pages: This is the very end of your pages after all elements are loaded, suitable for JavaScripts with events.
There are 2 Types of pages in Beat Cube and they are eplained below, read this first before you start inserting codes!
Parent Pages: These are pages that load when you first visit your website or when you refresh your website, most elements on your website load under them. You might want to add custom CSS for your music player, header and it's contents or maybe a modal code to this pages where needed.
Child Pages: These are the pages that load through ajax when you click a button on your website, they contain most of the elements but adding a css code there can take a while to load.
YouTube Demo Video: https://www.youtube.com/watch?v=p5yjAYsBing